I love Halloween and along with all the decorations, appetizers and treats I came up with, I wanted to make a fun spooky cocktail.
It may be Fall but I concocted a refreshing Summer-perfect bevvie that was just as good as our signature Halloween cocktail - I named it Human Eye-ball Juice to be themed for our Halloween gathering. I got lots of raves but fair warning... it sneaks up on you! Here is the recipe - sans photo.
Lychee Nut Martini Cocktail (aka Human Eye-ball Juice)
One can of Lychee Nuts, including the liquid (available at Asian Markets)
2 cups simple syrup (recipe follows)
1-2 cups of vodka
Ice - if desired
In a pitcher mix the simple syrup with the vodka (at this point, I have to recommend Rain vodka - its little known and very smooth). I use more simple syrup and more vodka because I like to add ice and it dilutes it all. Pour in the entire can. Voila - that's it.
Scoop out a lychee fruit to garnish each glass and add a sprig of mint if you like.
Simple Syrup
Bring equal parts sugar and water to boil until sugar dissolves. Once it cools, you can use it in your cocktail.

Sunday, November 18
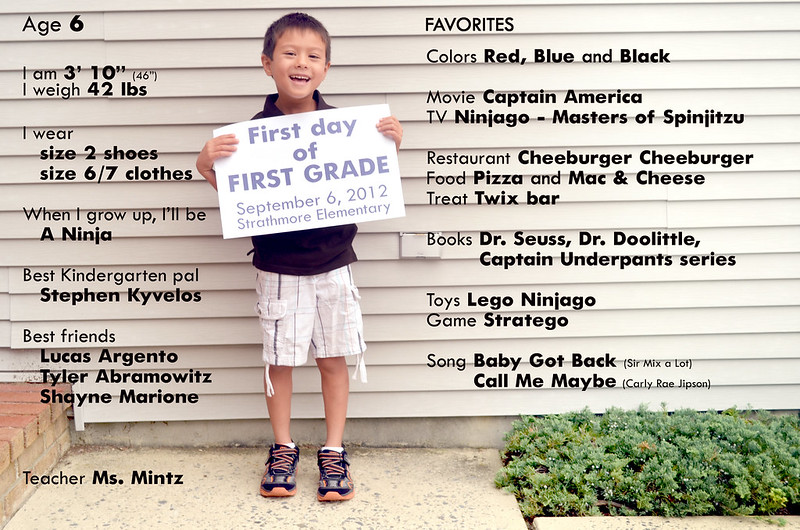
Thursday, September 6
First Day of First Grade
I made a similar poster last year and wasn't sure I'd remember to do it again this year - so I'm glad I followed through. It was fun to see the comparison even from just a year ago. I hope my son will enjoy looking back on these in the coming years.
I changed a few minor things because they will be the same year to year.
Sunday, August 19
Summer Camp Tip gift 2012
I'm trying something new - for me- posting from my phone. I hope it works. Unfortunately, I don't think I can link to anything.
And Now for my post:
Camp is over for the Summer - which makes me sad because now we have 2 1/2 weeks to find something to do with our son. Ugh!
Here are the camp tip 'gifts' I gave out this year: Blow guns with foam darts from the dollar store with a related message (borrowed from a lollipop post on Pinterest).
I also made matching cards to hold the $$ with a sign that said, "Blow THIS however you like."
Easy peasy and cheap, too!
Tuesday, May 22
Cupcake Frenzy
On a whim, I decided to bake cupcakes and play around with some ingredients. I went straight for the liquor cabinet. Why not? I made several variations using a yellow cake box mix - Pillsbury (my brand of choice because the cake is fluffy, not too sweet and bakes perfectly moist every time).
I started with a Kalua infused cupcake where I poured a non-specific amount of the coffee liquor into the batter. Then I made the chocolate frosting from the back of the Hershey's unsweetened cocoa powder box and - you guessed it - added some Kalua to it. After generously frosting the cupcakes, I dusted the top with cocoa powder. They looked really pretty but none lasted long enough for me to photograph them.
Then I made PB&J cupcakes and the chocolate frosting from above. Surprisingly, these were pretty good as well. I bake-lifted the idea from the Picky Palate website where she had made these bars that were yummy. These went as well. No photo.
The ones I did manage to stage and shoot were my Amaretto cupcakes. I poured an unspecified amount into the batter, baked per the box recipe, then made a frosting that I concocted. I did a whipped cream frosting folded into whipped butter with a touch of Amaretto. My thinking was that this would make the whipped frosting a bit stiffer. The taste was good but I should have chilled it again before piping it on the cupcakes because the consistency looked a bit funky. I crushed shelled pistachios and sprinkled them on top. These were quite dee-lish. I may try it again with a heartier frosting like cream cheese.
Here is my photo below

Friday, May 18
Store bought cake
This year, we ended up celebrating my son's birthday several times. There was the school party (see the Pikachu cupcakes), his real party, and his first sleepover. So we didn't want to overdo another celebration. We had a few of the kids in the neighborhood over for cake and a short, mid-week playdate. I bought a store bought cake and went to the dollar store and got these cute ninjas. Check it out... it really made it look personalized with very little effort. So don't let the fear of baking stop you from doing something fun - and different for your next gathering. The dollar store has lots of ways to spruce up a grocery store confection.
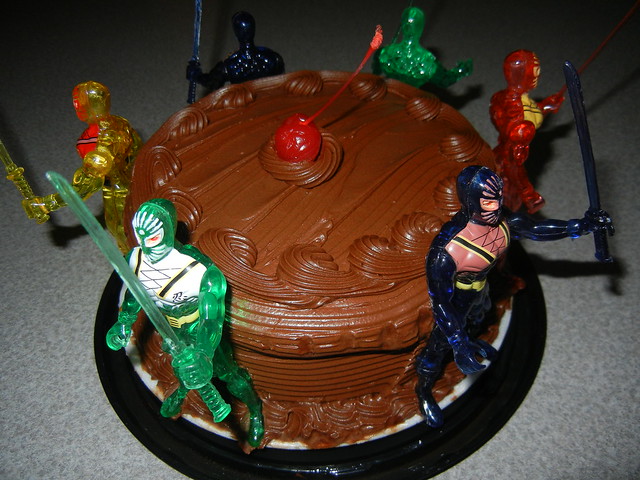 and here is another view

Monday, April 23
Cupcakes - Pikachu
These are cupcakes I made of Pikachu (one of the characters in Pokemon - a show on the Cartoon Network). My nephews were obsessed with Pokemon (12 years ago) and my son got that gene passed down to him. I made these for this 6th birthday party at school . This photo is only half the batch because I ran out of those gummy candies that I used for the ears.
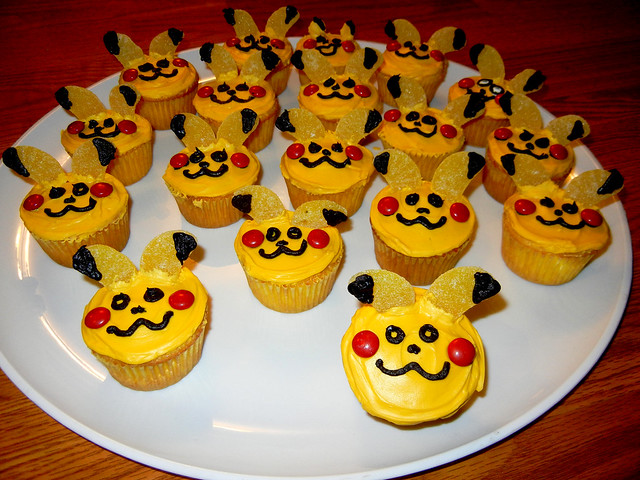
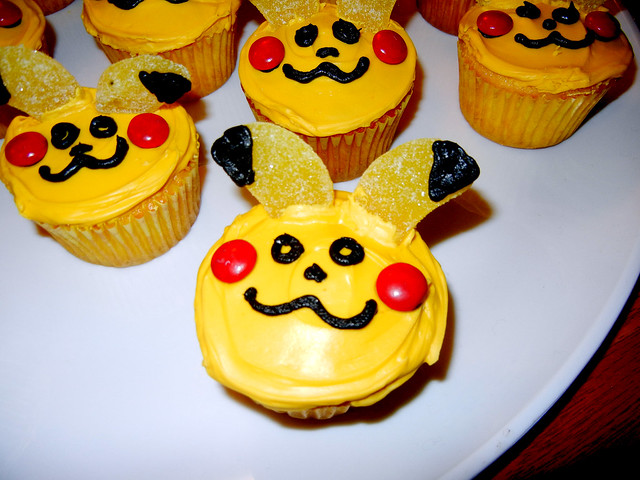
When I decided to make these, it was late, I was tired, it was raining hard outside and I had no cake mix. So, after going out to buy the mix, you can imagine I didn't think it through very well. The cake and face were simple. I used yellow frosting and black Wilton pre-made icing. For the rosy cheeks, I used M&M's.
The ears were the challenge. Since it was so late, I wanted to just use stuff we had in the house. I tried: cutting graham crackers (too crumbly), cut corners of Madeline cookies (too soft), Gold fish (these actually worked but I didn't want to ice them, and they felt too small), and cut corners of marshmallows (these worked but, again, I didn't want to ice them to make them yellow.
Nothing I had at home actually worked. So I gave up, went to the store tonight and bought those gummy, sugar-coated wedge candies. The problem is, I needed 30 cupcakes and the box only had about 18 yellow wedges. So, I guess I have to go back to the store in a little while.
The look on my son's face as the yellow cupcakes took shape into Pikachu was priceless and make it all worth the effort.
Sunday, March 25
Holiday Cookie Packages
For years, my aunt and uncle hosted all the family gatherings. Their home was centrally located for all of us and it was the largest place - which was needed to hold the up to 50 people that would often gather. Their home, though, was a Chinese laundromat in an increasingly deteriorating neighborhood. They lived on the second floor and kept a large apartment on the third floor that used to be rented out. They'd built their lives there for over 50 years, and even though the area and elements worsened, they kept the extended family close. This year, they finally sold the business, the building and closed up shop. They are in their mid-nineties. Yes, they worked up until they closed.
Now that the laundry is gone, its harder and harder to get together with my cousins. Where we used to visit each other at the laundry once a month, it wasn't until Christmas that we were all able to hook up.
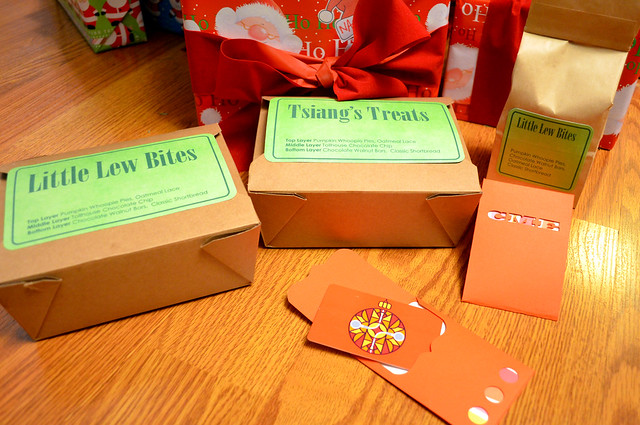
After much schedule organizing, we met at a local restaurant. I was excited to see everyone even if it was just a few hours and I made some cookies for each family and packaged them, personalizing the labels and the contents for everyone.
After much schedule organizing, we met at a local restaurant. I was excited to see everyone even if it was just a few hours and I made some cookies for each family and packaged them, personalizing the labels and the contents for everyone.
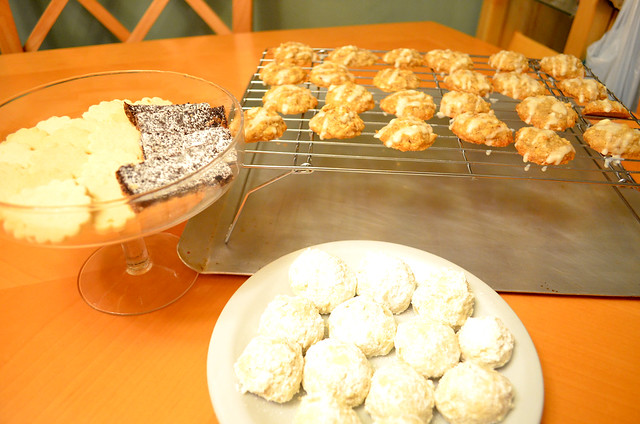
I made a ton of cookies over the holidays, probably around 15 dozen and 8 different kinds. Here are a few that I packaged up:
Shortbread, chocolate bar cookies, glazed oatmeal, powdered sugar greek balls.
Recipes: Shortbread are Martha Stewart. I got them from the ipad app. Greek Balls (see previous post). The others, I will try to come back and post either links or resources one day. :)
Shortbread, chocolate bar cookies, glazed oatmeal, powdered sugar greek balls.
Recipes: Shortbread are Martha Stewart. I got them from the ipad app. Greek Balls (see previous post). The others, I will try to come back and post either links or resources one day. :)
Of course, I snuck a few samples for myself. Yum.

For the packaging, I admit, I cheated a bit. My mom has a restaurant in Myrtle Beach, SC, and I got these cool kraft take out boxes from her restaurant supplier. I made the labels and Xyroned them on. I used a corner rounder cutter from Michael's to give the labels a more finished look.
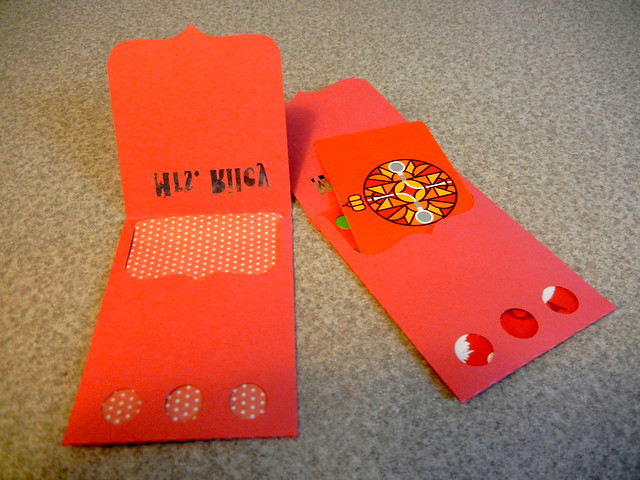
The kraft bags are wax lined bakery bags from Uline. I also made the gift card holders for the teens/tweens with an iTunes gift card and their initials cut out of the back.
Holiday Gift Card Holder
The not-so-recent chain of events which resulted in my losing all the scrapbook pages I'd created for 2011 and some of 2010 also made me lose some of the photos. I have also been less than organized with the photos I've taken since then. So, I'm not surprised that I just discovered photos of the gift card holder I made for my son's teacher and the teaching assistant.
I used red card stock and printed a patterned insert using some of the scrapbooking stash I managed to find. I think it was from MScraps but I don't remember.:( Then I typed in the teacher's name and cut out the gift card pattern using my Silhouette cutting machine.
Pattern available at Silhouette's website.
Pattern available at Silhouette's website.
FRONT
(this sample uses left over giftwrapping paper)
(this sample uses left over giftwrapping paper)

BACK
Monday, February 20
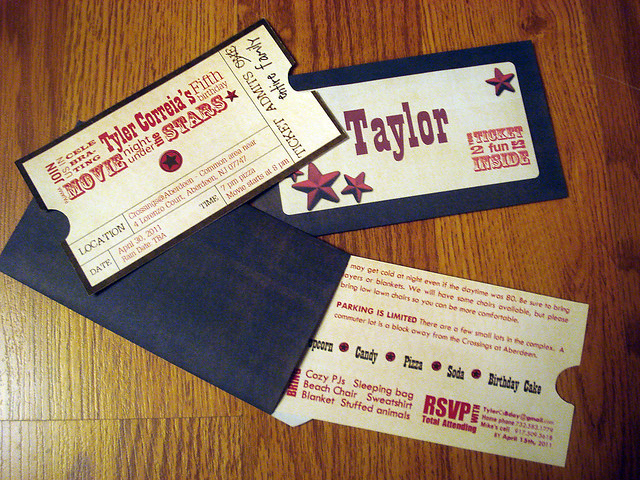
Outdoor Movie Party
I can't believe that I never posted my son's 5th birthday party. It was really fun... from start to finish, beginning with the invitations I hand made. I personalized the envelopes with each child's name and invited the whole family on the inside.I want to credit the paper and template designers but my laptop fried a few months ago and I lost all my stash and all my photos. :(
I'm pretty sure the papers were from MScraps and the template was from Simply J Studios at ScrapMatters.
Here are the invitation 'ticket', envelope and a close-up of the insert.
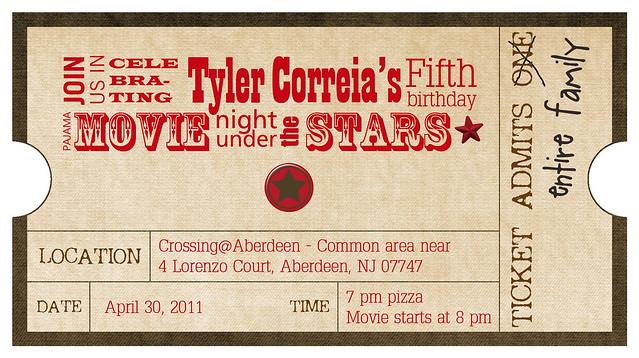 And here are some shots of the actual night.
The kids all came in their jammies with their blankets and chairs or sleeping bags.
We had a Pikachu pinata filled with toys and candy. Each kid had their own bag to fill up - and all the bags were full!
And here are some shots of the actual night.
The kids all came in their jammies with their blankets and chairs or sleeping bags.
We had a Pikachu pinata filled with toys and candy. Each kid had their own bag to fill up - and all the bags were full!

Each kid had their own bag to fill up - and all the bags were full!

Each kid got a few flashlight rings (a huge hit!) and glow braclets


We served Pizzas and had two cakes with Ben 10 decoration on them.

For the main feature, we set up a large canvas and projected the movie Astro Boy.


Tuesday, February 14
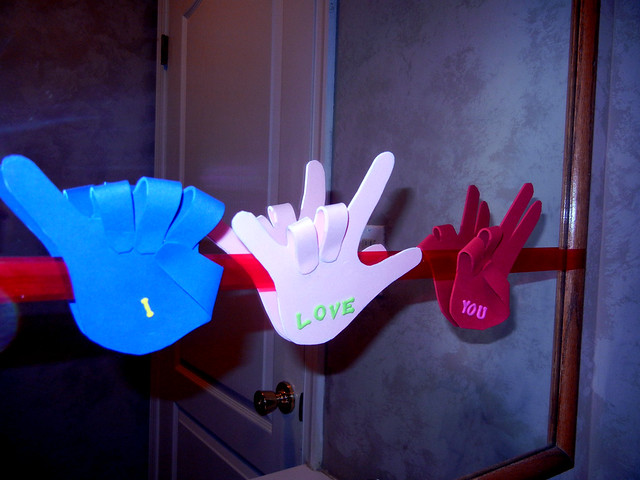
Valentines Crafts from Michael's
Happy Valentine's Day!
I got an email from Micheal's crafts and saw this fun project that I had to do with my DS. I modified it a bit. Instead of buying their pre-made foam hands, my son traced out his hands and we cut them out of foam sheets. The project 'spelled' out the letters I and U and I love you in sign language. Then I strung them together on a piece of transparent red ribbon and taped it to the bathroom mirror so that my husband would see it when he went in there. Thank you, Michaels. :)
We're going to do something similar for my FIL for his birthday card. My DS had so much fun making these.
Sunday, February 12
R
I found out that a co-worker's husband was diagnosed with a form of cancer that had metastasized to his lymph nodes. They are a very close couple and the vision they'd both had was of growing old with each other. Luckily, its totally treatable and he will hopefully be fine in a few months after some rigorous treatments. In the meantime, they are just going about life and being hopeful. I wanted to do something small for them both, knowing that a big gesture could potentially make him feel like the disease is too much in the forefront and being talked about at our work.
Before the holidays, the couple had gone on a yoga retreat and the both loved it. In fact, the husband said that it was a life-changing weekend for him. I decided to gather some yoga-type grownup treats and package them together. There is a 2 CD set that I got from Target and scented candles from Walmart. I personalized it by using his first initial to brand the products. His name is Russ, so I chose some R words that related to healing. Here are the photos below, and if you continue scrolling down, I've included a freeprintable (minus his name). I used some decorative paper from Michaels to build a layer up.
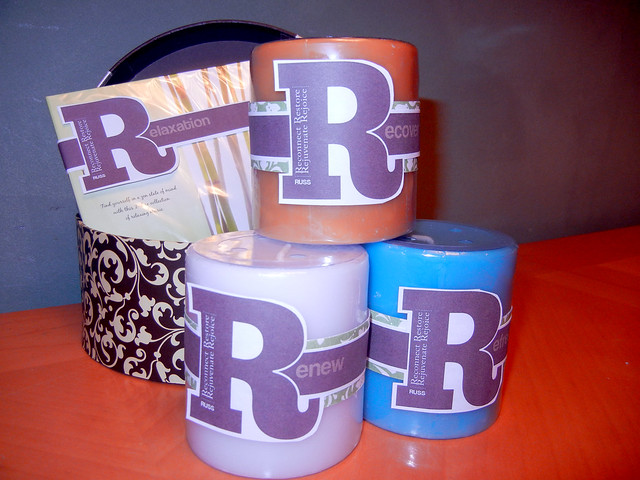
I placed it all in a cheap box I got at Tuesday Morning (under $3) and some coordinating brown tissue.
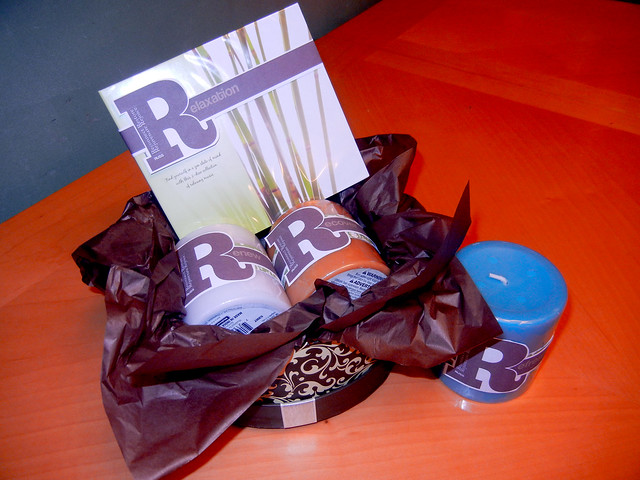
Here is a free downloadable printable of the REwords
I'm trying something new, I think you should be able to grab the jpg directly from the image below. If that doesn't work, please contact me. :)

Sunday, January 29
Tutorial: How to make your own cookie cutters.
WHY? Why would anyone bother doing this? See below - for the why and the how. I was inspired by a You Tube video (I think) which I've since tried to search for so I could credit her, but I couldn't, so I took a shot and making my own and thought I'd share it with you guys.

And here are the finished cookies. I didn't have time to ice them - mostly because they were all eaten, but also because I didn't have yellow food coloring. Maybe the next batch. For the Cookie, I used Martha Stewarts recipe

WHY? Why would anyone bother doing this? See below - for the why and the how. I was inspired by a You Tube video (I think) which I've since tried to search for so I could credit her, but I couldn't, so I took a shot and making my own and thought I'd share it with you guys.
And here are the finished cookies. I didn't have time to ice them - mostly because they were all eaten, but also because I didn't have yellow food coloring. Maybe the next batch. For the Cookie, I used Martha Stewarts recipe
Sunday, January 22
The Dragon New Year ... and a giveaway
Happy Chinese New Year.
This is the Year of the Dragon - MY year. :) Which, if you can do the math, means I'll be 48 at the end of the year. Yikes!
With my Aunt getting older and my mom living so far away, I cooked the whole meal (well, most of it) for my family. It was surprisingly so much fun.
Chinese New Year is akin to Thanksgiving for us. Its a time of reflection, happiness, and hope for the future. So, even if you are not Asian, Happy New Year everyone. May the luck of the Dragon spread to you all
.


I wanted to make something to go in a frame that I rotate prints in. I am also printing one for my mom's restaurant - with the addition of the restaurant name.
GONG HAY FOT CHOY
Monday, January 16
Lego Mania
Have you ever tried to build something with lego and been frustrated by just digging around for the pieces you might need? We did. It felt like it took longer to find the pieces than it did to make anything. My husband decided to separate the bigger pieces by color after a night like this...
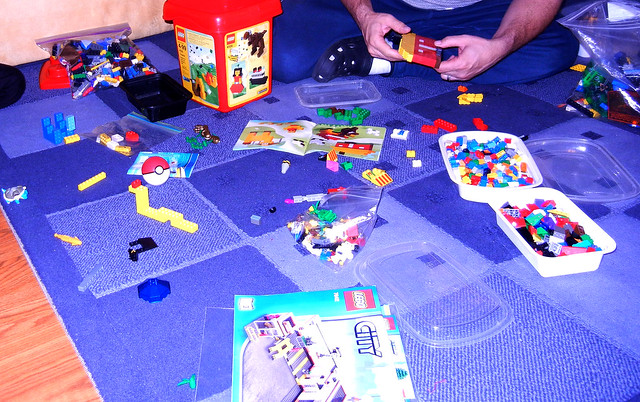
We put them in ziplock bags and dumped them into a big box that we'd gotten. The box was perfect for just the bigger pieces but it overflowed when you added all the Legos we had into it. This is the box we started with - our neighbor had gotten 2 boxes as a gift and gave us one.

The best part of organizing the Lego is that the next morning, my 5 year old came down, pulled out all the bags, tossed them all over the floor, took out what he wanted, built his toy then - shocker - put all the pieces back into the bags, pressed the air out of the bags, zipped them back up, and put them all back in the box.
What? That made it all so worth it.
This is what he built. He called it Wormy and carried it around for a week.

But folks, that was just the lead-in ... THIS is what I really wanted to blog about. Take a look at my Lego Organization!
Lego-Mania
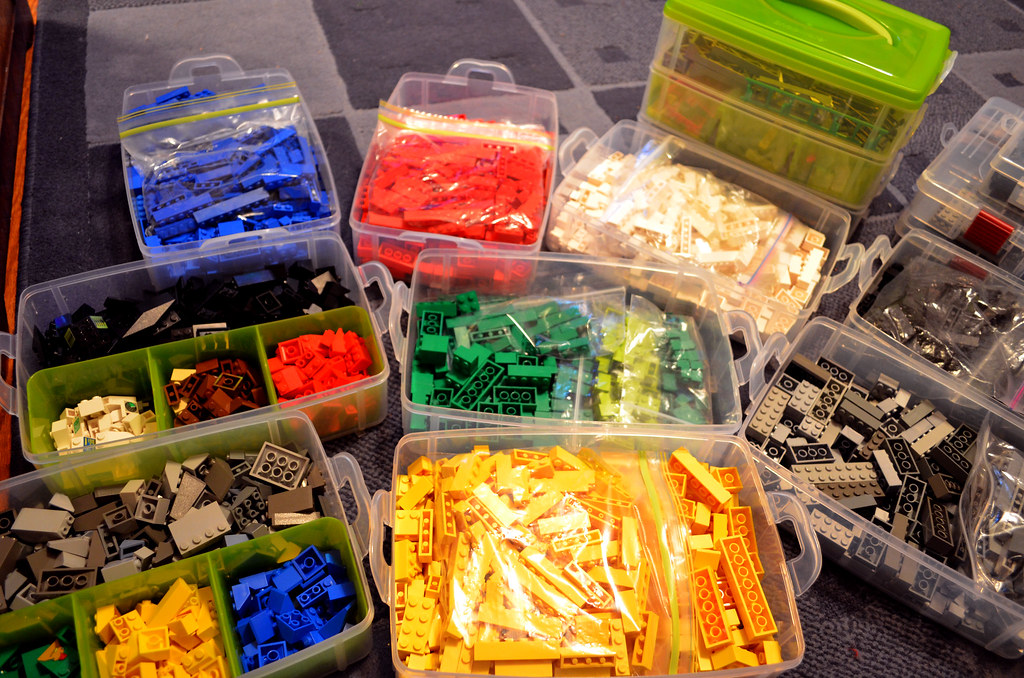
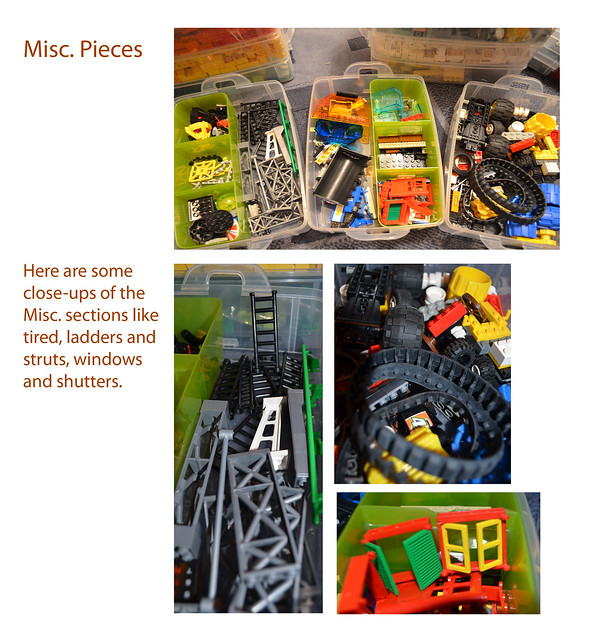
i bought some boxes that stacked and (see the handle looking things?) they clicked on to each other so they can be carried as a group. Some of the boxes even had little trays inside to further separate into boxes. This allowed me to break them down by color and some by unique shapes.
Mainly they were grouped by color according to the ones that had 'regular thickness' and 2 circles side-by-side.
Here is a detail of the Yellow box. I wish this had a separator so I could keep the 2 circled pieces from the larger ones.


(oops, I have a typo below, but its late and I'm too tired to fix it right now.)

Voila! My masterpiece!
I know... I call it organized, my friends are calling me uber-anal. But this is how the Legos have stayed, for months, even with my son playing with them regularly.
So, yeah, I'm a little crazy. Yeah, it took a long time and a good bit of my Christmas break. But I LOVE it. :)

WHERE TO BUY IT.
TARGET: the stackable boxes that click into each other - 4 pack (was a bought at a post-Christmas sale and I haven't seen it again ), 3 pack with smaller boxes inside.
Wal-mart: Largest tackle boxes (the ones that held the flat pieces)
How did we get so many Legos?
We started out with our neighbor cleaning out his aunt's house and he gave a couple of boxes to our friends. They didn't need that many so they gave us a big box. I love Lego so we were thrilled. We didn't really have any yet, so that was great. Then my sister got rid of all the ones her sons played with. That more than doubled our supple. Then, we cleaned out my aunt and uncle's home before they moved and they gave us about 4 giant box sets and the rest is organizational history.
Over this Christmas, we did actually buy my DS some more sets. Don't laugh. But there is a new kind called Ninjago with dojos and other things from the Ninjago Spinjitzu show.
Thursday, January 5
Blog Prompts
I found this on - you guessed it - Pinterest from a site called Jenna's Journeys. I loved doing the ScrapMatter's daily blog so this naturally appealed to me. Here is a link in case you want to play along at your own pace.
http://jennasjourneyblog.blogspot.com/2011/11/16-blog-prompts-for-when-youre-stuck.html
http://jennasjourneyblog.blogspot.com/2011/11/16-blog-prompts-for-when-youre-stuck.html
Thanksgiving Wall Sign
This year we decided to have a few friends over for Thanksgiving and what better way to really make them feel like part of the family than printing a welcoming poster? I included our guests' last names, printed it cheaply at Costco and found some nice wooden frames on sale at Micheals. Our guests loved it and even asked if they could have it when we took it down.


Wednesday, January 4
Greek Balls - Kourambiedes
Wow, has it really been a month since I last posted? Shame on me! What have I been doing? Baking, wrapping, gifting, all the usual holiday stuff. I think I baked about 15 dozen cookies -- so far.
Tonight alone, I made 2 different kinds totaling 7 dozen. One of the cookies I made was from an older woman named Mary, who lived on the third floor of my uncle's Chinese Laudromat. We always visited her when we went to his place in the Summers. She'd give us lemonade and these rich butter cookies and these awesome, light morsels covered in powered sugar.
She's passed away over 20 years ago, but her recipe lives on. We've always called them Greek Balls because Mary was from Greece, but (thank you internet) I think the real name is Kourambiedes.
There are some delicious and complicated recipes on the internet but I think some of the best recipes are those simple original ones handed down. I'm sharing them with you to pay forward the delicious yumminess that was shared with me as a child.

Greek Balls
Ingredients:
4 sticks unsalted butter - room tempurature
3/4 cup powdered sugar
1 egg yolk
1 1/.2 teaspoon vanilla
4 cups all purpose flour
3/4 cups chopped pecans
Save a bowl of extra powdered sugar for finishing.
Directions:
Pre-heat oven to 350 degrees
Blend powdered sugar and flour together well.
In a bowl, mix butter until light and fluffy
Add in the flour-sugar mixture, egg yolk, vanilla and chopped nuts - mix well.
Form into balls, bake 8 to 10 minutes.
Immediately roll in powdered sugar.
Subscribe to:
Comments (Atom)